|
|
|
|
In reply to Post #27
hi great diiy job on he marker [pole,just to confirm the bung used is code is etp044 as i see a 19mm bung is etp 045.can anyone confirm this is correct before i purchase,
just realised there maybe different conduit internal diameters.yoiurs you say is 19.7mm id and screwfix conduit is 17mm id,
will order accordingly
thanks in advance
|
|
|
|
Hi,
How do you join the poles so they don't snag line on the join?
|
|
|
|
|
|
|
In reply to Post #35
My pleasure 👍
|
|
|
|
In reply to Post #33
Thanks for sharing this little gem.
|
|
|
|
In reply to Post #33
OK, cheers mate.
|
|
|
|
|
They will be too small as the internal diameter of the conduit is 19.7mm thats why I went with the 20mm 👍
|
|
|
|
In reply to Post #30
Hi hitman, had a look and see they do them in 18mm do you think they'd be too loose or OK with a bit of glue?
|
|
|
|
In reply to Post #30
👍🏻 Cool, I'll take a look
|
|
|
|
|
https://www.vital-parts.co.uk/
|
|
|
|
|
The looks really neat mate good job, wher did you get the parts from?
|
|
|
|
In reply to Post #27
As for the weight I made my own as I have some lead myself,I used a qui ck link with a size 8 swivel and put two bits of wire through the swivel then doubled the wire over to make 4 strands.
The 4 loose ends of the wire was clamped into a cordless drill the swivel end was gripped with pliers and I then started the drill to twist all the cables together.
I then just simply cut it down and bent the bottom end so it could stand up,I then simply put this into a empty tin from Sainsburys that had some kids food in.
I filled it with molten lead and when cooled used a piece of heat shrink so it covers the quick link tail so no line could snag on it, ONLY shrink down the very bottom of the heat shrink over the swivel as this will let you fit your marker poles to the quick link as seen below.
  Width=500> Width=500>
These weights are just over a kilo 👍
All in with the bits needed and dependant on how long you make your poles i believe a whole 16ft set can be made for around £20 👍
|
|
|
|
MK11
I have just got a few more parts to try out and to try and improve the marker poles so again Ill try to explain how they are made.
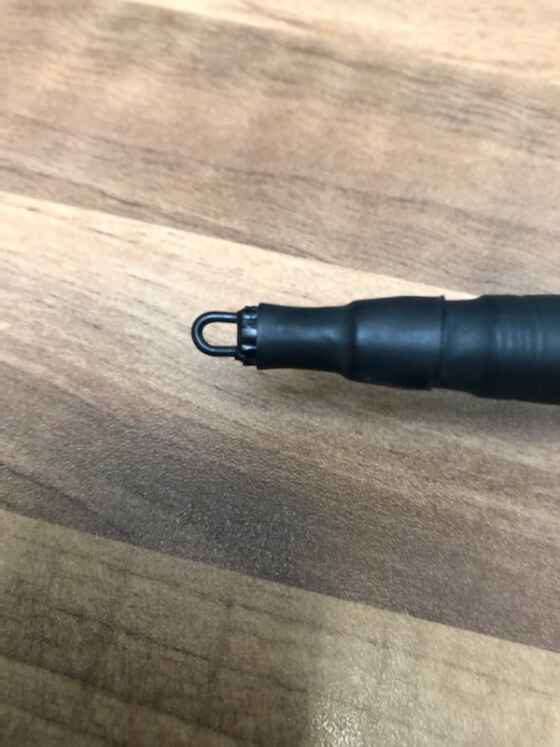
Firstly as in the MK1 end tapered end where the weight is to be attached hasnt changed at all so the process is the same,the difference is the ends of the poles where they are joined together.
Instead of using a end cap I have now used a tapered bung, they are slightly bigger than the inside of the conduit but when pushed down its a very tight fit you want it inside the tube at about 40mm depth.
I filled the conduit with water from the other end and its 100% sealed so will not let any water in.
 Width=400> Width=400>
For the connectors for joining the poles together I have now used M6 x 20mm (Round straight connectors) I have found that they are slightly too big for the conduit so I used a hot air gun I guess a hair dryer would do so soften the ends,but once again do not heat up for too long.
I found the conduit softened up brilliantly and I was able to insert the connectors with ease and once the conduit cooled its a very tight fit.
I still secured it with 2 x rivets and Ive decided not to glue these in incase the poles break so you can easily drill the rivets out and pull the connectors and push the plugs out ,the nuts and bolts are not stainless steel so I have asked if they can make them with these in mind and Im awaiting a answer from them.
 Width=400> Width=400>
As you can see below this leaves a very neat finish and there is no need for any shrink tube, I did test this with water after I removed the bung and did notice that it wasnt totally waterproof but when the bung is inserted the amount of water ingress is very minimal at either end and personally I could live with that having created a neater finish.
 Width=400> Width=400>
The code for the Tapered plug is - ETP044
Round straight connectors - TC115
Again these are sourced from Vital-Parts
If you do use this company ask for a product catalogue as there are some interesting things in there that is carpers can use Ie feet for your bedchair,barrow etc etc.
|
|
|
|
In reply to Post #25
Funnily enough, I was thinking about using weights but wasn't sure if it was a bit over kill lol. I'm pretty sure I've got a load round my mums house from years back.
|
|
|
|
In reply to Post #23
I just bought some cheap weights eye bolt couple of washers the weight is spread and the pole aint never gonna move 1.25kg

|
|
|
|
|
|
|
I made them at just over a kilo 👍
Ill talk through that as well tomorrow
|
|
|
|
In reply to Post #21
OK cool, top man, oh and how big is the weight you've got?
|
|
|
|
The screw type are 100% better
BUT wait for my write up tomorrow as Ive improved the design with less parts, Im just waiting for a little information from someone 😉😉
|
|
|
|
In reply to Post #19
Nice one hitman, clear enough for a dummy like me to understand. Out of curiosity do you think the conjuit coupling collars, the type that push on would work or does it need to be the screw type.
|
|
|
|
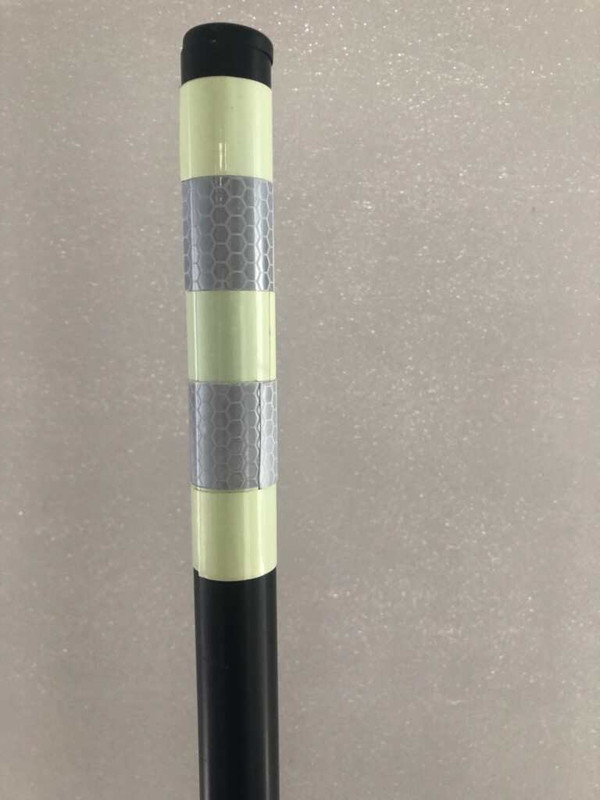
Ill try and explain how I made these marker poles and if anyone doesnt quite understand just ask some questions.
MK1
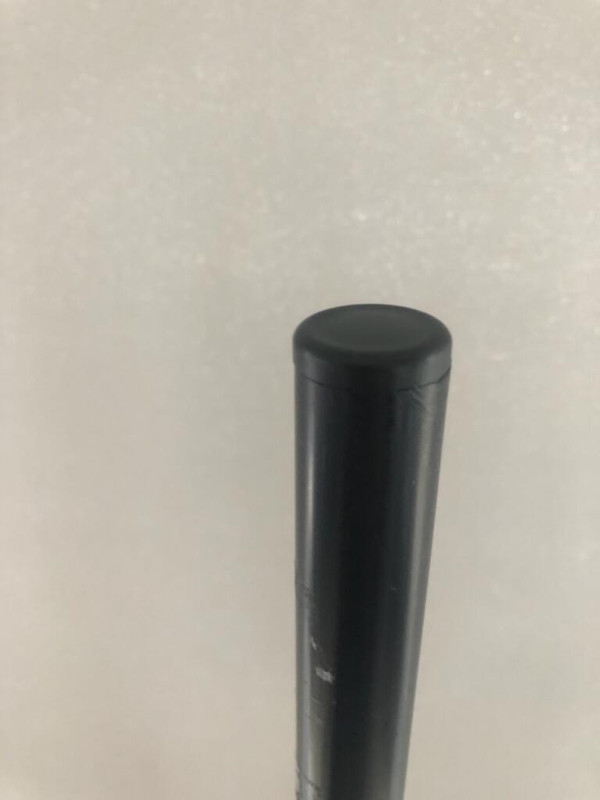
First of all I got the Caulk nozzles and cut the tab off at the top it almost has to be flush with the top part to make a snug fit.
For the loop at the bottom I used the very same loops as when your making leads but obviously without the swivel,I pulled this down using a piece of braided line as its a very tight fit until the desired length you require.
I then filled the nozzle up with pink grip,not so much to secure the loop but to make it waterproof and add a little weight,Silicone would also do.
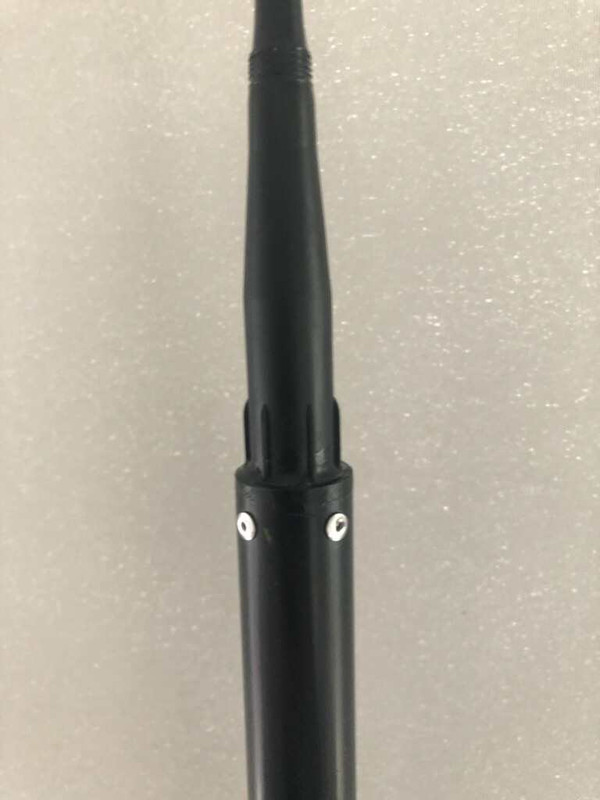
When the pink grip had set I glued in the nozzle into the conduit as far as the vertical lines on the nozzle then I drilled 4 x 2.5mm holes around the tube about 10mm up from the end and used 2.4mm (dome pop blind rivets Aluminium ) this was to secure the nozzle firmly.
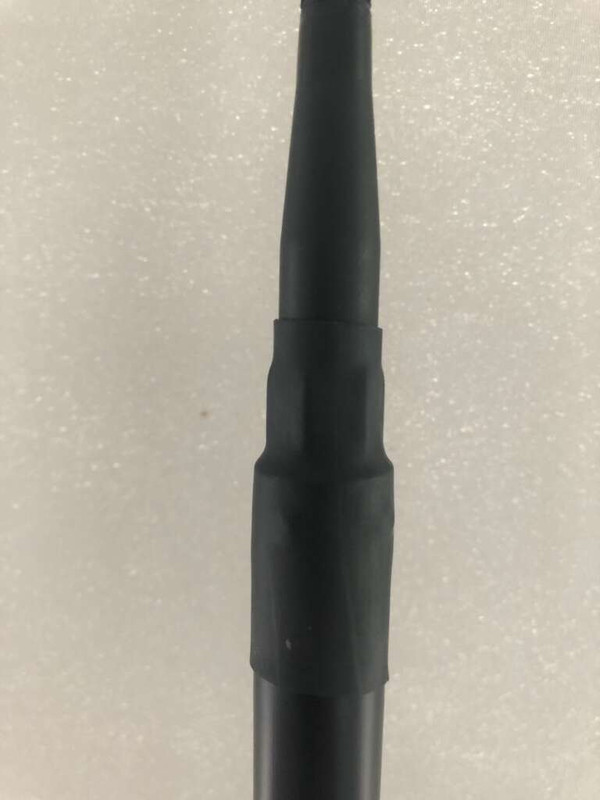
For the extra lengths of the pole I used a plastic bung glued in either end of the length to make it waterproof then 1 x male and 1x female plastic connecter from screwfix again glued then as before I used the same rivets to properly secure them.
This procedure will carry on until your desired length of poles you require.
The top pole (marker pole) obviously only had one connector attached but was sealed both ends with the bungs but the top bung is not glued in as Im working on finding a light of some sorts.
Then it was just a case of buying the relevant marker and glow in the dark tape to wrap around the top pole.
The only thing that bothered me was the ridges on the connectors that are too big and that the line could become snagged and potentially get cut off and for that reason I used heat shrink on these parts just to make sure it didnt happen.
One important thing tho if you do use the heat shrink is to only have enough to cover the ridge and the rivets.I found out the hard way YOU need to have the male and female parts tight together first hold upright or lay completely flat then gently shrink the heat shrink down,failure to do it this way will result in the connectors warping and they will not screw together properly.
Obviously you can make each section as long as you require but 4ft lengths are about right apart from the top section that I made 1ft long.
So all the parts needed
20mm conduit + male/female connectors I got from screwfix
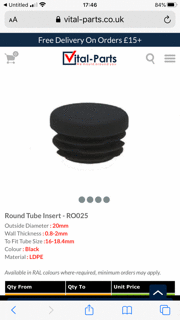
End Bungs I got from vital parts - code (R0025)
Black nozzles I got from decorating direct
Rivet gun and rivets from eBay
Hi-viz tape from Amazon
I already had the heat shrink and pvc glue.
MK2 Ill write up tomorrow
|
|
|
|
In reply to Post #17
No worries mate.
|
|
|
|
Sorry Ive been busy Ill deffo do a little write up tomorrow as Ive planned a day off diy 
|
|
|
|
In reply to Post #12
Any news on a write up mate as am interested in making some myself rather than the expensive alternative.
|
|
|
|
In reply to Post #12
Looking good and got to be less expensive than the Atropa !
|
|
|
|
In reply to Post #12
I'll look forward to reading that , looks good 👍
|
|
|
|
In reply to Post #12
Top man 👍🏻
|
|
|
|
|
Ill do a little write up later 👍
|
|
|
|
|
Nice one hitman and old geezer that looks spot on
|
|
|
|
In reply to Post #9
Hitmans pics


|
|
|
|
In reply to Post #8
|
|
|
|
|
|
|
In reply to Post #1
and the winner of the worlds biggest camera goes to
|
|
|
|

Worked for me, hit the box for full image then add width=500 before the />
You can also use full linked which saves adding anything but you may want to change your privacy settings first
|
|
|
|
just edit it put a space width=500>
|
|
|
|
I did but it didnt work lol
Maybe lock this thread and Ill start another but download them one by one
|
|
|
|

Width=500 
|
|
|
|
 https://ibb.co/02qh0PF
https://ibb.co/r5XgFcc
https://ibb.co/yNn22xn
https://ibb.co/XbFFQJx
https://ibb.co/nLPQQbq
https://ibb.co/9GdB7cq
https://ibb.co/LnM1xXR
https://ibb.co/W5dnCSX
https://ibb.co/2dXDjJp
https://ibb.co/z6Dptx2Width=400>
|
|
|
|
|
