

In reply to Post #14
I had to Google that, and it looks expensive. If I go to round bar with a groove for the inners then it's just the connections I need to square off. It should be easy to drill a hole, rout the square, and round the male section rather than try broaching freehand.
Since I'll be cutting the male squares from round bar, I think square will be easier than hex and less work to make the jig work accurately at 4 orientations rather than 6, especially when I'm adapting woodworking tools and techniques
I had to Google that, and it looks expensive. If I go to round bar with a groove for the inners then it's just the connections I need to square off. It should be easy to drill a hole, rout the square, and round the male section rather than try broaching freehand.
Since I'll be cutting the male squares from round bar, I think square will be easier than hex and less work to make the jig work accurately at 4 orientations rather than 6, especially when I'm adapting woodworking tools and techniques
In reply to Post #15
I haven't got round to a stabiliser design yet, I'll use stainless coach screw with some relief channels for the point of the sticks which will hold in most ground with short 2 rod bars I typically use, I will have to come up with something for softer ground tho
I haven't got round to a stabiliser design yet, I'll use stainless coach screw with some relief channels for the point of the sticks which will hold in most ground with short 2 rod bars I typically use, I will have to come up with something for softer ground tho

In reply to Post #1
This may not help but it might set you off down a different route, I made a few rod pods and the latest was similar to a lot of others ie the top bar is round, when screwing in the buzzer its hit and miss whether its inline or not, I have now changed that to ali angle, the buzzer push's through the top and a plastic long round threaded bar screws up from the underneath, so now hold the buzzer and tighten from under side, would an angle piece of material be an option ?
This may not help but it might set you off down a different route, I made a few rod pods and the latest was similar to a lot of others ie the top bar is round, when screwing in the buzzer its hit and miss whether its inline or not, I have now changed that to ali angle, the buzzer push's through the top and a plastic long round threaded bar screws up from the underneath, so now hold the buzzer and tighten from under side, would an angle piece of material be an option ?
In reply to Post #18
Do you have a picture dave? I can't really visualise it from that description
Do you have a picture dave? I can't really visualise it from that description
In reply to Post #19
I think he mean like the Chris Brown bankware
I think he mean like the Chris Brown bankware
Some of the best banksticks that I have owned, were Nash ones from the 80's. They were made from aluminium but instead of being round, they were triangular so when they were pushed into the ground, they would not twist. The screw thread at the top was also triangular but made from plastic and could be pulled off the stick so when packing up, nothing to unscrew as you could leave your alarm or bars on the plastic thread. Also with being plastic, you could screw the bars down tight so they would not twist and you never got the bimetallic corrosion that you got with the Gardner sticks that were popular at the time. Also as the tops pulled off, they were interchangeable with different length sticks which made them quiet universal as you could use your long sticks or short sticks without having to unscrew anything.
Sadly they stopped making them but, I still have 3 of them left which I occasionally use.
Sadly they stopped making them but, I still have 3 of them left which I occasionally use.
In reply to Post #19
I'll take some and get them up asap
I'll take some and get them up asap
In reply to Post #19
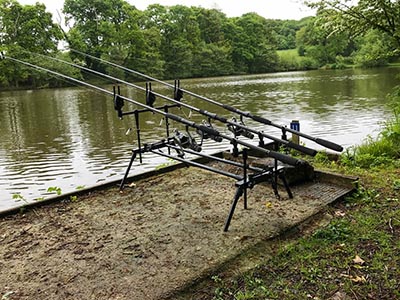

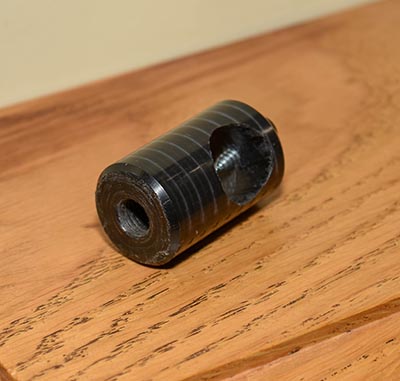
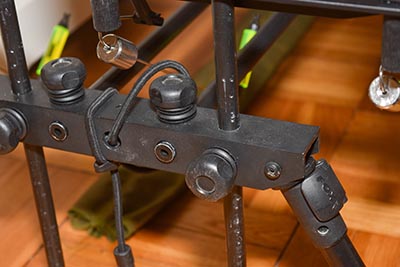
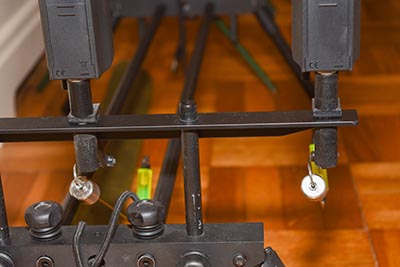
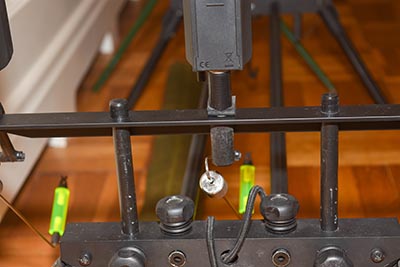
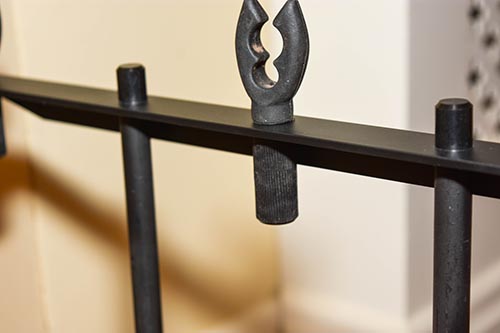
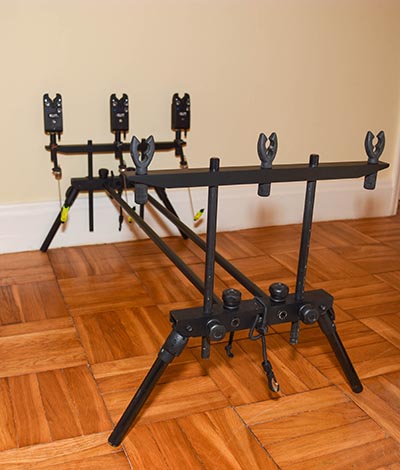
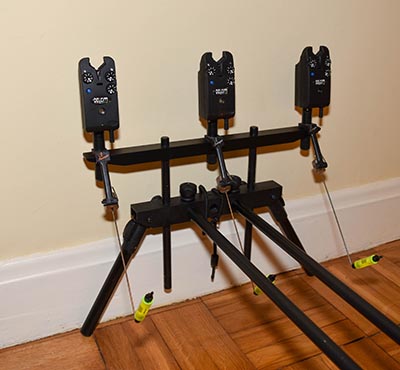
The photos on the bank shows how it was with round bars, all the others shows the angle
ali section and screws that I made including the bobbins, the thumb knobs came from
Axminster tools, the rubber gromets between them and the square section are from a
local electrical supplier used when the knockout is removed from back boxes, if you need any more info just ask

EDIT
Fotgot yo say inside the square section there is a piece of mild steel which the thumb knob screws into as the ali is too soft for long time use.
The photos on the bank shows how it was with round bars, all the others shows the angle
ali section and screws that I made including the bobbins, the thumb knobs came from
Axminster tools, the rubber gromets between them and the square section are from a
local electrical supplier used when the knockout is removed from back boxes, if you need any more info just ask
EDIT
Fotgot yo say inside the square section there is a piece of mild steel which the thumb knob screws into as the ali is too soft for long time use.
In reply to Post #23
That looks sturdy mate, angle makes a lot of sense for the bars in terms of strength, rigidity and ease of alignment. I'm set on black/gold(polished brass) Swan neck bars for my setup, as I said, I'm going for form and function.
Did you paint it yourself? I haven't figured out what to do there yet, I don't know of any paint that'll last on the banksticks, anodising/powder coating would be better but I don't know how much that'll cost and might make assembly harder. I want a DIY finish so I can give it a refurb in future ideally
Zack mentioned bimetellic corrosion, I've already learned a bit about this from the thread in non carp but one joint is bothering me on the Swan necks
To do the centre fitting I'll drill the horizontal hole a tight fit for the Ali bar, but for alignment and long term strength I'll add a small indent in the Ali, and use a grub screw. Corrosion here may cause it to loosen which I don't want. How would I insulate between the brass grub and Ali bar, or is there a better metal for the grub that won't react with brass or Ali? All other joints will be done with epoxy which may not insulate fully but will certainly keep water out
That looks sturdy mate, angle makes a lot of sense for the bars in terms of strength, rigidity and ease of alignment. I'm set on black/gold(polished brass) Swan neck bars for my setup, as I said, I'm going for form and function.
Did you paint it yourself? I haven't figured out what to do there yet, I don't know of any paint that'll last on the banksticks, anodising/powder coating would be better but I don't know how much that'll cost and might make assembly harder. I want a DIY finish so I can give it a refurb in future ideally
Zack mentioned bimetellic corrosion, I've already learned a bit about this from the thread in non carp but one joint is bothering me on the Swan necks
To do the centre fitting I'll drill the horizontal hole a tight fit for the Ali bar, but for alignment and long term strength I'll add a small indent in the Ali, and use a grub screw. Corrosion here may cause it to loosen which I don't want. How would I insulate between the brass grub and Ali bar, or is there a better metal for the grub that won't react with brass or Ali? All other joints will be done with epoxy which may not insulate fully but will certainly keep water out
In reply to Post #24
Isn't what you really want just a screw point titanium stick with fixed 2 rod bars welded to the top.
Isn't what you really want just a screw point titanium stick with fixed 2 rod bars welded to the top.
In reply to Post #25
If its got Swan neck bars I'll take two
If its got Swan neck bars I'll take two
In reply to Post #26
Contact a bike frame builder maybe. They will be able to do the bends and welds.. though you'd probably want thicker gauge than a bike chain/seat stay.
Plus they'll cost you about £500
Contact a bike frame builder maybe. They will be able to do the bends and welds.. though you'd probably want thicker gauge than a bike chain/seat stay.
Plus they'll cost you about £500
In reply to Post #27
That's why I gave up with Ti, a quick look about showed about £70 for a short bit of 5/8 rod
That's why I gave up with Ti, a quick look about showed about £70 for a short bit of 5/8 rod

In reply to Post #24
Loctite 270 might be suitable? Will secure the grubscrew and put a barrier between the two metals.
Loctite 270 might be suitable? Will secure the grubscrew and put a barrier between the two metals.
In reply to Post #24
I did paint it all, I used a primer that is just for ali then matt black spray from Homebase that is used for exterior gates etc, the black and brass sounds good, the only brass I used was at the end of the square tubes where the legs attach, you can't see them but I turned down some brass rod and threaded part of it so the cut down Fox sticks screwed onto them, the idea was to un screw them part of the way and swivel up for transit but in the end I just put the front and back section as is into the unhooking mat, I did find that connecting ali to ali (rod into tube) could be a nightmare to get apart when testing, when you have finished your project I would like to see some photos if possible, good luck, if I can be of any help....
PS
The tubes that connect front to back came from a local garden centre, the ones that make frames using plastic corners/T pieces etc quite thick and strong.
I did paint it all, I used a primer that is just for ali then matt black spray from Homebase that is used for exterior gates etc, the black and brass sounds good, the only brass I used was at the end of the square tubes where the legs attach, you can't see them but I turned down some brass rod and threaded part of it so the cut down Fox sticks screwed onto them, the idea was to un screw them part of the way and swivel up for transit but in the end I just put the front and back section as is into the unhooking mat, I did find that connecting ali to ali (rod into tube) could be a nightmare to get apart when testing, when you have finished your project I would like to see some photos if possible, good luck, if I can be of any help....
PS
The tubes that connect front to back came from a local garden centre, the ones that make frames using plastic corners/T pieces etc quite thick and strong.